
Phân tích source code LinkedHashMap
Giới thiệu LinkedHashMap
LinkedHashMap là một collection class do Java cung cấp. Class này kế thừa từ HashMap và duy trì thêm một doubly linked list trên nền HashMap, nhờ đó có các đặc điểm sau:
- Khi iteration, các phần tử được duyệt theo thứ tự insertion.
- Hỗ trợ sắp xếp theo thứ tự access của phần tử, phù hợp để đóng gói công cụ LRU cache.
- Vì bên trong dùng doubly linked list để duy trì các node, hiệu suất iteration tỉ lệ thuận với số lượng phần tử. So với
HashMap, nơi hiệu suất tỉ lệ thuận với capacity, hiệu suất iteration cao hơn nhiều.
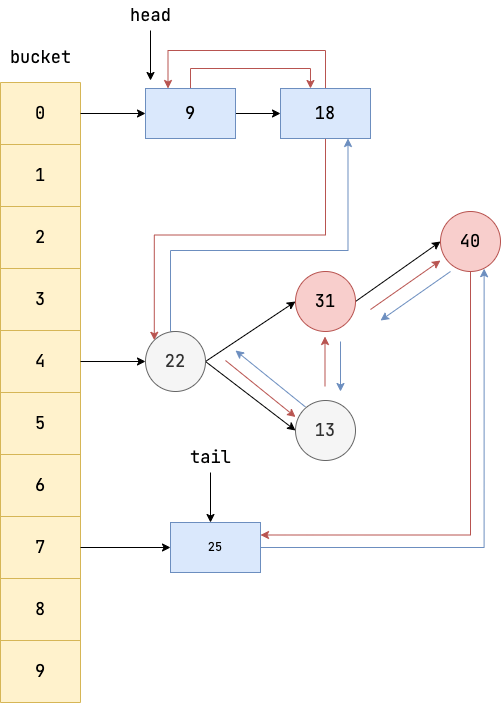
Cấu trúc logic của LinkedHashMap như hình dưới. Trên nền HashMap, nó duy trì một doubly linked list giữa các node, giúp các node, linked list và red-black tree vốn được phân tán trên các bucket khác nhau liên kết có thứ tự.
Ví dụ sử dụng LinkedHashMap
Duyệt theo thứ tự insertion
Như dưới đây, ta lần lượt thêm các phần tử vào LinkedHashMap, sau đó thực hiện iteration.
HashMap < String, String > map = new LinkedHashMap < > ();
map.put("a", "2");
map.put("g", "3");
map.put("r", "1");
map.put("e", "23");

for (Map.Entry < String, String > entry: map.entrySet()) {
    System.out.println(entry.getKey() + ":" + entry.getValue());
}
Kết quả:
a:2
g:3
r:1
e:23
Có thể thấy thứ tự iteration của LinkedHashMap giống với thứ tự insertion. Đây là đặc điểm mà HashMap không có.
Duyệt theo thứ tự access
LinkedHashMap định nghĩa mode sắp xếp accessOrder (kiểu boolean, mặc định là false). accessOrder bằng true biểu thị thứ tự access, còn bằng false biểu thị thứ tự insertion.
Để thực hiện iteration theo thứ tự access, ta có thể dùng constructor của LinkedHashMap truyền thuộc tính accessOrder và đặt accessOrder thành true, biểu thị rằng map có thứ tự access.
LinkedHashMap<Integer, String> map = new LinkedHashMap<>(16, 0.75f, true);
map.put(1, "one");
map.put(2, "two");
map.put(3, "three");
map.put(4, "four");
map.put(5, "five");
// Access phần tử 2, phần tử này sẽ được chuyển đến cuối linked list
map.get(2);
// Access phần tử 3, phần tử này sẽ được chuyển đến cuối linked list
map.get(3);
for (Map.Entry<Integer, String> entry : map.entrySet()) {
    System.out.println(entry.getKey() + " : " + entry.getValue());
}
Kết quả:
1 : one
4 : four
5 : five
2 : two
3 : three
Có thể thấy thứ tự iteration của LinkedHashMap giống với thứ tự access.
LRU cache
Từ phần trước, ta biết rằng có thể dùng LinkedHashMap để đóng gói một LRU (Least Recently Used, ít được sử dụng gần đây nhất) cache đơn giản, bảo đảm khi số phần tử lưu trữ vượt quá capacity của container thì phần tử được access ít gần đây nhất sẽ bị xóa.
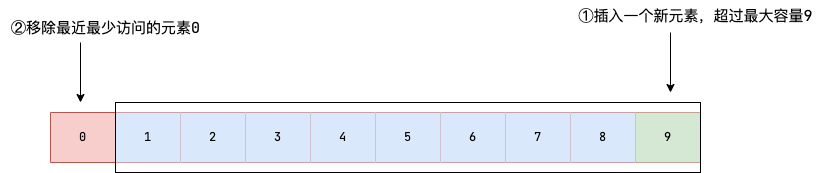
Ý tưởng triển khai cụ thể như sau:
- Kế thừa
LinkedHashMap; - Chỉ định
accessOrderlàtruetrong constructor. Khi đó, khi access phần tử, phần tử này sẽ được chuyển đến cuối linked list; phần tử đầu linked list là phần tử ít được access gần đây nhất; - Override method
removeEldestEntry. Method này trả về một giá trịbooleanđể choLinkedHashMapbiết có cần xóa phần tử đầu linked list hay không (cache có capacity giới hạn).
public class LRUCache<K, V> extends LinkedHashMap<K, V> {
    private final int capacity;

    public LRUCache(int capacity) {
        super(capacity, 0.75f, true);
        this.capacity = capacity;
    }

    /**
     * Trả về true khi size vượt quá capacity, báo cho LinkedHashMap xóa cache item cũ nhất (tức phần tử đầu linked list)
     */
    @Override
    protected boolean removeEldestEntry(Map.Entry<K, V> eldest) {
        return size() > capacity;
    }
}
Code test như sau. Tác giả khởi tạo cache có capacity là 3, sau đó lần lượt thêm 4 phần tử.
LRUCache<Integer, String> cache = new LRUCache<>(3);
cache.put(1, "one");
cache.put(2, "two");
cache.put(3, "three");
cache.put(4, "four");
cache.put(5, "five");
for (int i = 1; i <= 5; i++) {
    System.out.println(cache.get(i));
}
Kết quả:
null
null
three
four
five
Từ output có thể thấy, vì capacity của cache là 3 nên khi thêm phần tử thứ 4, phần tử thứ 1 bị xóa. Khi thêm phần tử thứ 5, phần tử thứ 2 bị xóa.
Phân tích source code LinkedHashMap
Thiết kế Node
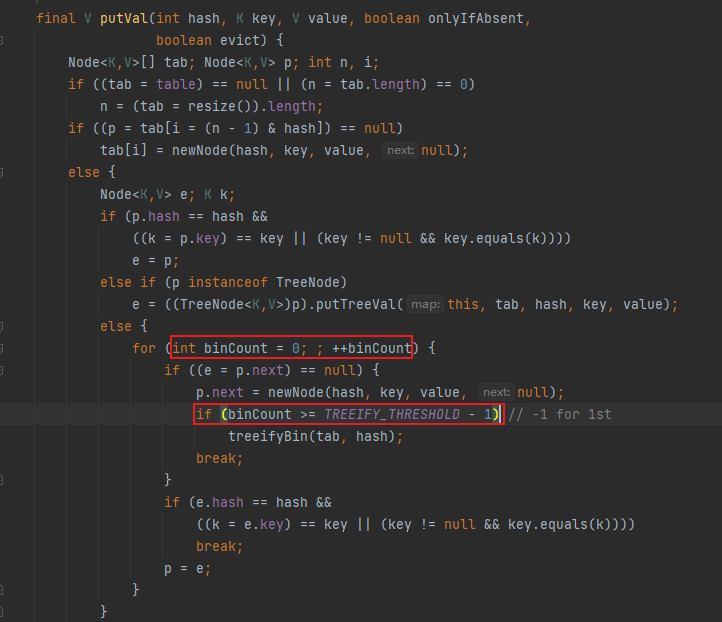
Trước khi thảo luận chính thức về LinkedHashMap, hãy nói về thiết kế của node Entry trong LinkedHashMap. Ta biết rằng các node trên bucket của HashMap được chuyển thành linked list do collision sẽ được chuyển thành red-black tree khi thỏa mãn hai điều kiện sau:
Số node trên linked list đạt ngưỡng treeification là 7, tứcTREEIFY_THRESHOLD - 1.- Capacity của bucket đạt capacity treeification tối thiểu, tức
MIN_TREEIFY_CAPACITY.
🐛 Đính chính (tham khảo issue#2147):
Số node trên linked list đạt ngưỡng treeification là 8, không phải 7. Vì source code duyệt từ phần tử đầu tiên của linked list với index bắt đầu từ 0, điều kiện được đặt là 8-1=7. Thực tế, khi duyệt đến node cuối, nó mới kiểm tra độ dài toàn bộ linked list lớn hơn hoặc bằng 8 để thực hiện treeification.
Trên nền HashMap, LinkedHashMap tạo một doubly linked list cho từng node trên bucket. Điều này khiến tree node sau khi chuyển thành red-black tree cũng phải có đặc điểm của doubly linked list, tức mỗi tree node cần có hai reference để lưu địa chỉ của predecessor và successor. Vì vậy, thiết kế class tree node TreeNode là một vấn đề khá khó.
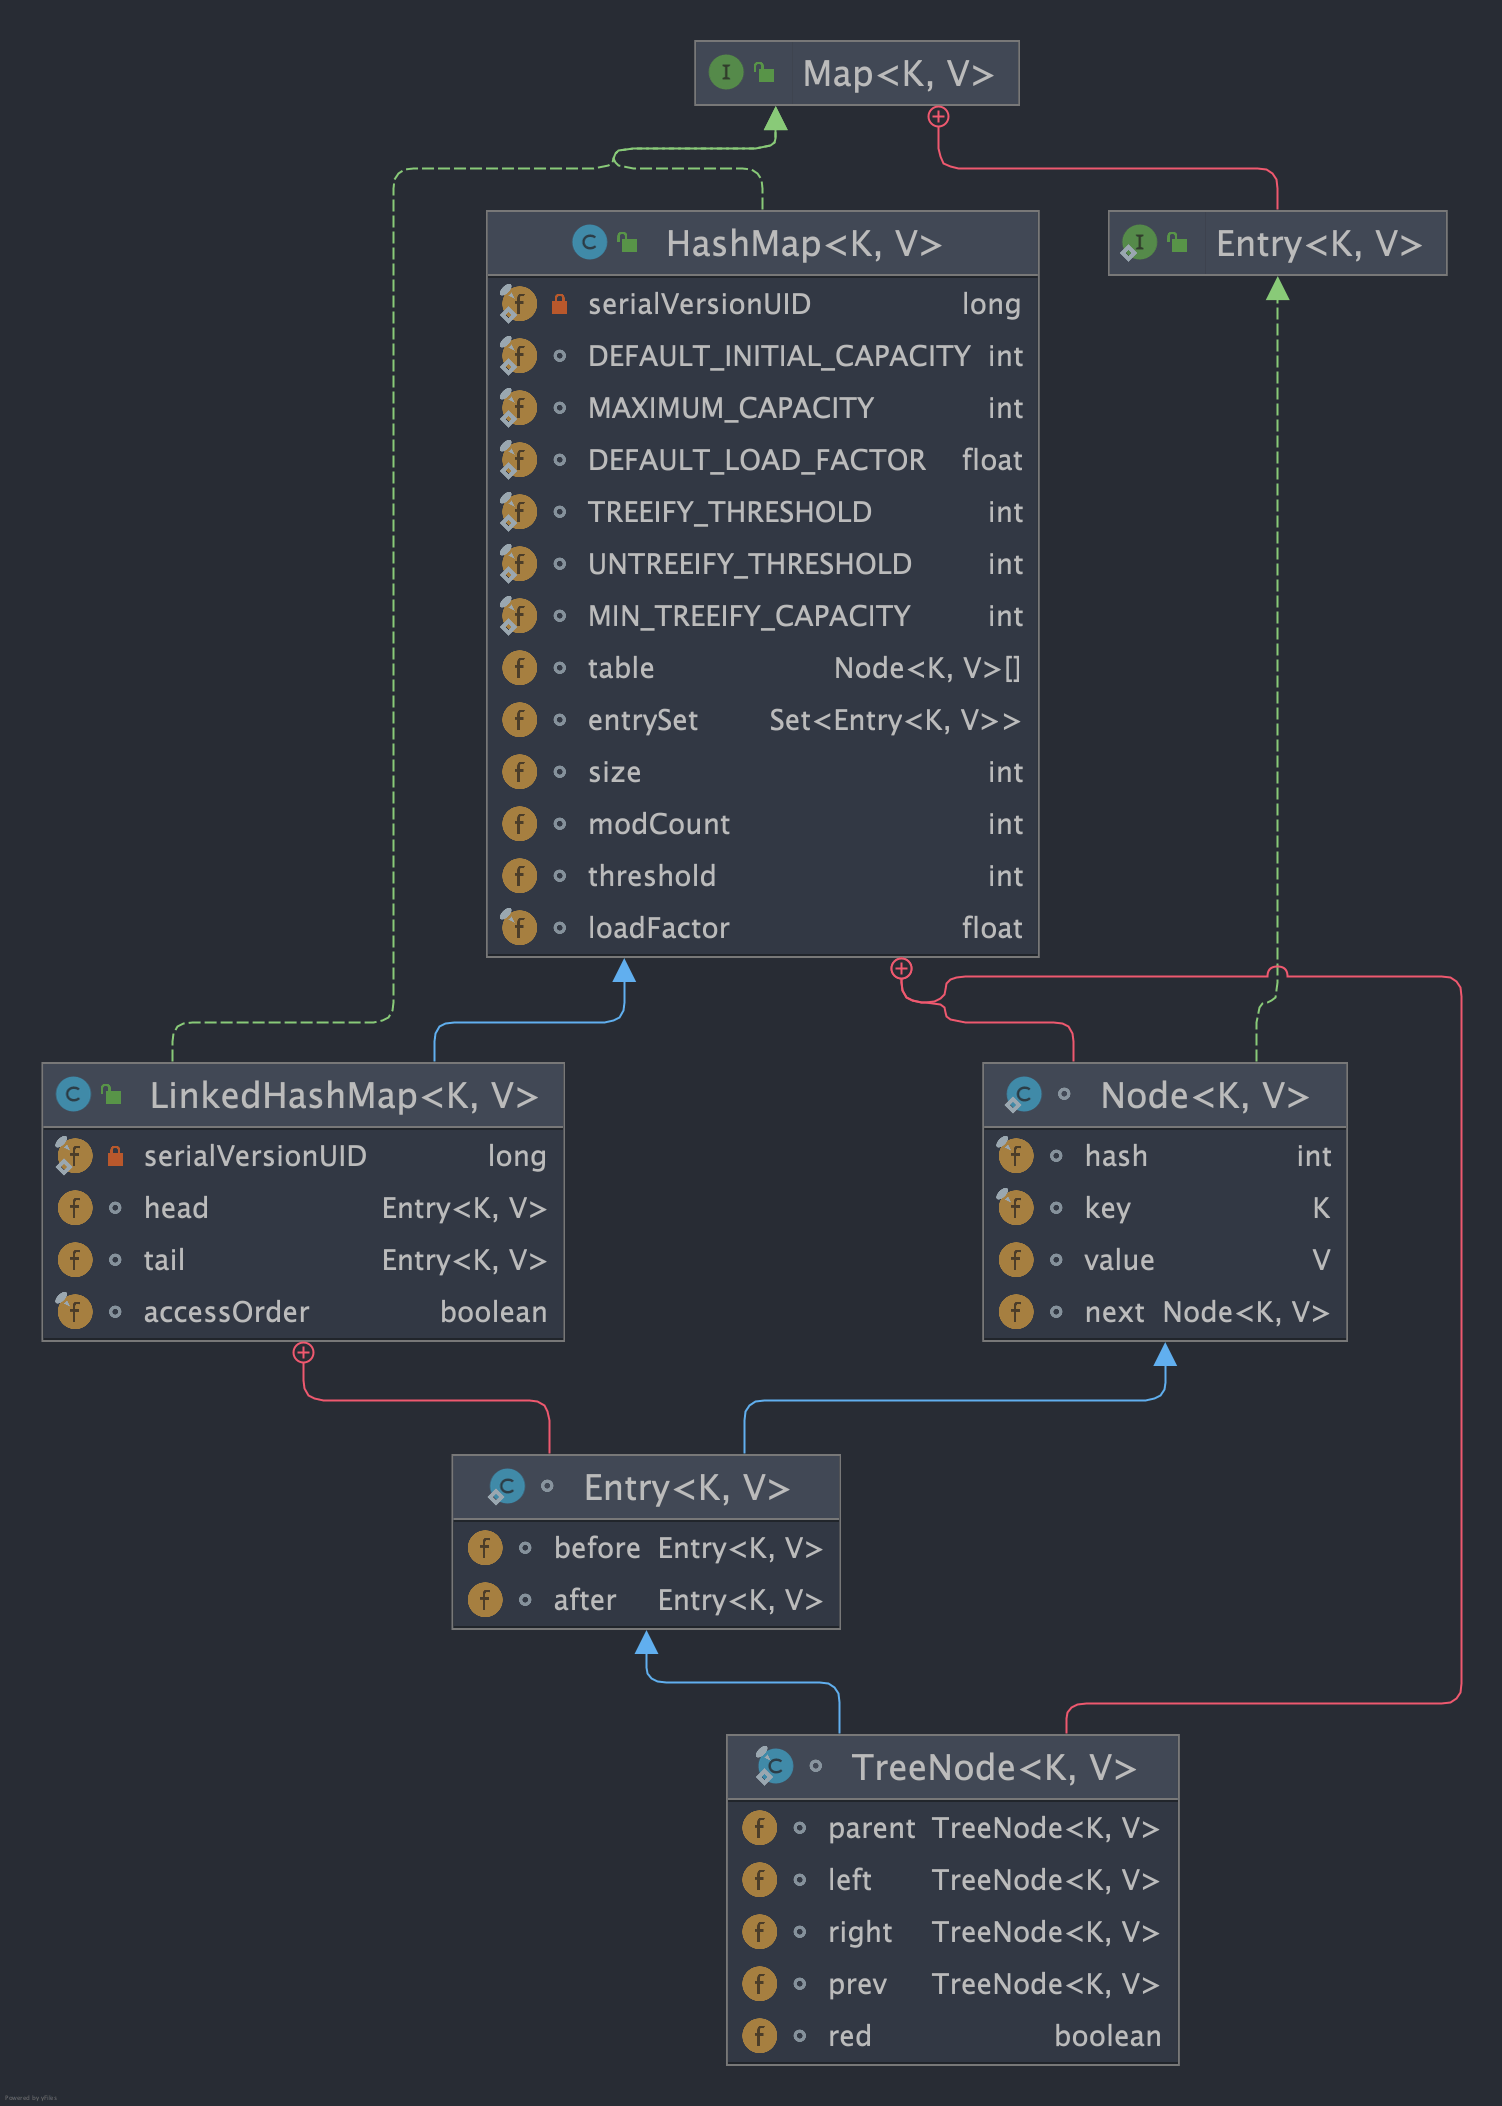
Về việc này, hãy xem class diagram các node của hai class. Có thể thấy:
- Inner class
EntrycủaLinkedHashMapdựa trên nền tảng củaHashMap, thêm các pointerbeforevàafterđể node có đặc điểm của doubly linked list. - Tree node
TreeNodecủaHashMapkế thừaEntrycủaLinkedHashMap, class vốn có đặc điểm của doubly linked list.
Nhiều bạn đọc sẽ có thắc mắc: tại sao tree node TreeNode của HashMap phải lấy đặc điểm doubly linked list từ LinkedHashMap? Tại sao không triển khai trực tiếp pointer predecessor và successor trên Node?
Trước hết trả lời câu hỏi thứ nhất. Ta biết LinkedHashMap thêm các pointer doubly để triển khai đặc điểm doubly linked list trên node của HashMap. Vì vậy, khi linked list bên trong LinkedHashMap chuyển thành red-black tree, node tương ứng sẽ chuyển thành tree node TreeNode. Để tree node vẫn có đặc điểm doubly linked list khi dùng LinkedHashMap, tree node TreeNode cần kế thừa Entry của LinkedHashMap.
Tiếp theo là câu hỏi thứ hai. Tại sao không triển khai trực tiếp pointer predecessor và successor trên node Node của HashMap, rồi để TreeNode kế thừa Node nhằm lấy đặc điểm doubly linked list? Thực tế cách này cũng được. Tuy nhiên, khi dùng HashMap, class node Node lưu key-value pair sẽ có thêm hai reference không cần thiết, chiếm thêm memory không cần thiết.
Vì vậy, để class node Node ở tầng dưới của HashMap không có reference dư thừa nhưng class node Entry của LinkedHashMap vẫn có reference lưu linked list, designer cho node Entry của LinkedHashMap kế thừa Node và thêm reference lưu predecessor, successor là before, after, để các node cần đặc điểm linked list tự triển khai logic tương ứng. Sau đó tree node TreeNode kế thừa Entry để lấy hai pointer before, after.
static class Entry<K,V> extends HashMap.Node<K,V> {
        Entry<K,V> before, after;
        Entry(int hash, K key, V value, Node<K,V> next) {
            super(hash, key, value, next);
        }
    }
Nhưng cách này chẳng phải cũng khiến TreeNode khi dùng HashMap có thêm hai reference không cần thiết sao? Đây cũng là một dạng lãng phí space mà?
static final class TreeNode<K,V> extends LinkedHashMap.Entry<K,V> {
  // lược bỏ

}
Về vấn đề này, hãy trích một đoạn comment của tác giả. Các tác giả cho rằng với thuật toán hashCode tốt, xác suất HashMap chuyển thành red-black tree không cao. Kể cả khi chuyển thành red-black tree và trở thành tree node, nó cũng có thể lại chuyển từ TreeNode thành Node do remove hoặc resize. Vì vậy, xác suất sử dụng TreeNode không lớn, và có thể chấp nhận sự lãng phí bộ nhớ này.
Because TreeNodes are about twice the size of regular nodes, we
use them only when bins contain enough nodes to warrant use
(see TREEIFY_THRESHOLD). And when they become too small (due to
removal or resizing) they are converted back to plain bins.  In
usages with well-distributed user hashCodes, tree bins are
rarely used.  Ideally, under random hashCodes, the frequency of
nodes in bins follows a Poisson distribution
Constructor
LinkedHashMap có 4 constructor, implementation cũng khá đơn giản: trực tiếp gọi constructor của parent class, tức HashMap, để hoàn tất initialization.
public LinkedHashMap() {
    super();
    accessOrder = false;
}

public LinkedHashMap(int initialCapacity) {
    super(initialCapacity);
    accessOrder = false;
}

public LinkedHashMap(int initialCapacity, float loadFactor) {
    super(initialCapacity, loadFactor);
    accessOrder = false;
}

public LinkedHashMap(int initialCapacity,
    float loadFactor,
    boolean accessOrder) {
    super(initialCapacity, loadFactor);
    this.accessOrder = accessOrder;
}
Như đã đề cập ở trên, trong trường hợp mặc định accessOrder là false. Nếu muốn LinkedHashMap sắp xếp key-value pair theo thứ tự access (tức phần tử chưa được access gần đây nằm ở đầu linked list, phần tử được access gần đây chuyển đến cuối linked list), cần gọi constructor thứ 4 và đặt accessOrder thành true.
Method get
Method get là method duy nhất được override trong các thao tác create, read, update, delete của LinkedHashMap. Khi accessOrder là true, sau khi hoàn tất việc query phần tử, method sẽ chuyển phần tử vừa access đến cuối linked list.
public V get(Object key) {
     Node < K, V > e;
     // Lấy key-value pair của key, nếu rỗng thì return trực tiếp
     if ((e = getNode(hash(key), key)) == null)
         return null;
     // Nếu accessOrder là true thì gọi afterNodeAccess để chuyển phần tử hiện tại đến cuối linked list
     if (accessOrder)
         afterNodeAccess(e);
     // Return value của key-value pair
     return e.value;
}
Từ source code có thể thấy các bước thực thi của get rất đơn giản:
- Gọi
getNodecủa parent class, tứcHashMap, để lấy key-value pair; nếu rỗng thì return trực tiếp. - Kiểm tra
accessOrdercó phảitruekhông. Nếu làtrue, nghĩa là cần bảo đảm thứ tự access của linked list trongLinkedHashMap, chuyển sang bước 3. - Gọi
afterNodeAccessđược override trongLinkedHashMapđể thêm phần tử hiện tại vào cuối linked list.
Điểm chính nằm ở implementation của method afterNodeAccess; method này chịu trách nhiệm chuyển phần tử đến cuối linked list.
void afterNodeAccess(Node < K, V > e) { // move node to last
    LinkedHashMap.Entry < K, V > last;
    // Nếu accessOrder là true và node hiện tại không phải node cuối linked list
    if (accessOrder && (last = tail) != e) {

        // Lấy node hiện tại, predecessor và successor
        LinkedHashMap.Entry < K, V > p =
            (LinkedHashMap.Entry < K, V > ) e, b = p.before, a = p.after;

        // Đặt pointer successor của node hiện tại thành null để ngắt liên kết với successor
        p.after = null;

        // Nếu predecessor là null, nghĩa là node hiện tại là node đầu linked list, nên để head trỏ đến successor
        if (b == null)
            head = a;
        else
            // Nếu predecessor không phải null, để predecessor trỏ đến successor
            b.after = a;

        // Nếu successor không phải null, để successor trỏ đến predecessor
        if (a != null)
            a.before = b;
        else
            // Nếu successor là null, nghĩa là node hiện tại ở cuối linked list, trực tiếp để last trỏ đến predecessor. Nhánh else này thực ra không có ý nghĩa, vì if ở đầu đã bảo đảm p không phải node cuối nên after đương nhiên không thể là null
            last = b;

        // Nếu last là null, nghĩa là linked list hiện tại chỉ có một node p, nên để head trỏ đến p
        if (last == null)
            head = p;
        else {
            // Ngược lại, để pointer predecessor của p trỏ đến node cuối, sau đó để pointer successor của node cuối trỏ đến p
            p.before = last;
            last.after = p;
        }
        // tail trỏ đến p, từ đó chuyển node p đến cuối linked list
        tail = p;

        ++modCount;
    }
}
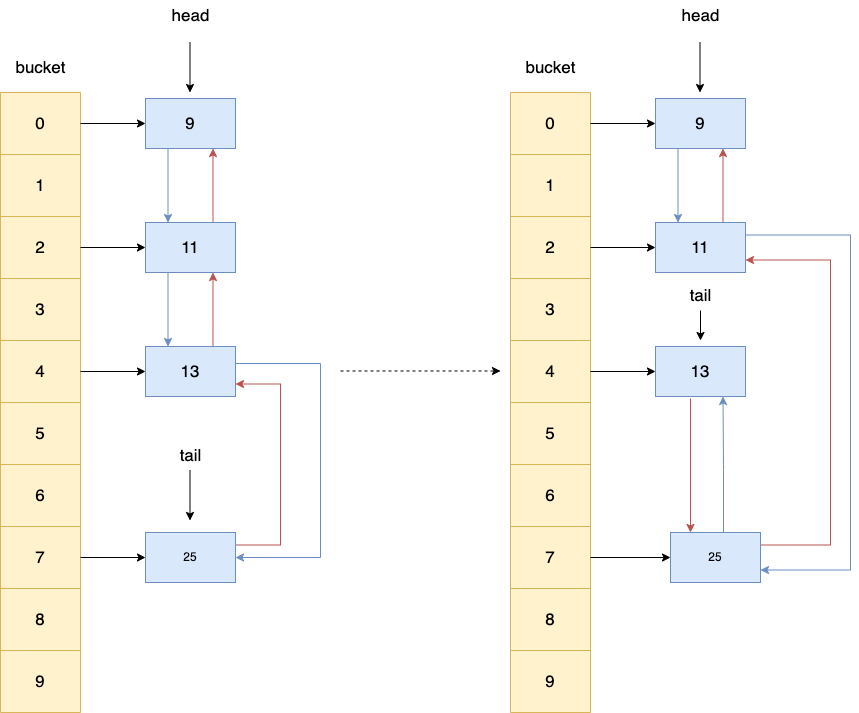
Từ source code có thể thấy method afterNodeAccess thực hiện các thao tác sau:
- Nếu
accessOrderlàtruevà cuối linked list không phải node hiện tại p, ta cần chuyển node hiện tại đến cuối linked list. - Lấy node hiện tại p, predecessor b và successor a của nó.
- Đặt pointer successor của node hiện tại p thành null để ngắt liên kết với successor p.
- Thử để predecessor trỏ đến successor. Nếu predecessor là null, nghĩa là node hiện tại p là node đầu linked list, nên trực tiếp đặt successor a thành node đầu, sau đó nối p vào cuối linked list.
- Tiếp tục để successor a trỏ đến predecessor b.
- Các thao tác trên đã liên kết predecessor với successor và tách node hiện tại p ra. Bước này thêm node hiện tại p vào cuối linked list. Nếu cuối linked list là null, nghĩa là linked list hiện tại chỉ có một node p, nên chỉ cần để head trỏ đến p.
- Các thao tác trên đã đưa p đến cuối linked list. Cuối cùng, chỉ cần để pointer tail, tức pointer trỏ đến cuối linked list, trỏ đến p.
Có thể kết hợp với hình dưới để hiểu: phần tử có key là 13 được chuyển đến cuối linked list.
Nếu vẫn chưa hiểu rõ cũng không sao, chỉ cần biết tác dụng của method này; sau này có thời gian hãy từ từ tìm hiểu thêm.
newNode - thêm node mới vào cuối linked list
Phần trên đã giới thiệu cách afterNodeAccess chuyển node đã tồn tại đến cuối linked list. Vậy node mới được insert được thêm vào linked list như thế nào?
Câu trả lời là LinkedHashMap override method newNode của HashMap. Khi HashMap insert key-value pair mới, nó gọi newNode để tạo node object. Trong method được override, LinkedHashMap không chỉ tạo node Entry mà còn gọi thêm linkNodeLast để link node đó vào cuối doubly linked list:
// newNode của HashMap là implementation thông thường
Node<K,V> newNode(int hash, K key, V value, Node<K,V> next) {
    return new Node<>(hash, key, value, next);
}

// LinkedHashMap override newNode, gọi thêm linkNodeLast
Node<K,V> newNode(int hash, K key, V value, Node<K,V> e) {
    LinkedHashMap.Entry<K,V> p =
        new LinkedHashMap.Entry<>(hash, key, value, e);
    linkNodeLast(p);  // Điểm chính: nối node mới vào cuối linked list
    return p;
}
Cách triển khai method linkNodeLast như sau:
// Nối node vào cuối doubly linked list
private void linkNodeLast(LinkedHashMap.Entry<K,V> p) {
    LinkedHashMap.Entry<K,V> last = tail;
    tail = p;  // tail trỏ đến node mới
    if (last == null)
        head = p;  // linked list rỗng, head cũng trỏ đến node mới
    else {
        p.before = last;  // predecessor của node mới trỏ đến node cuối cũ
        last.after = p;   // successor của node cuối cũ trỏ đến node mới
    }
}
Đây là cơ chế cốt lõi để LinkedHashMap triển khai thứ tự insertion: mỗi lần insert node mới, thông qua việc override newNode và gọi linkNodeLast, node mới được thêm vào cuối doubly linked list. Khi iteration, bắt đầu từ node đầu head và duyệt theo pointer after, ta có thể lấy tất cả phần tử theo thứ tự insertion.
Tương tự, LinkedHashMap cũng override method newTreeNode để bảo đảm tree node khi insert cũng được link vào cuối linked list:
TreeNode<K,V> newTreeNode(int hash, K key, V value, Node<K,V> next) {
    TreeNode<K,V> p = new TreeNode<K,V>(hash, key, value, next);
    linkNodeLast(p);
    return p;
}
Thao tác hậu kỳ của method remove - afterNodeRemoval
LinkedHashMap không override method remove, mà trực tiếp kế thừa method remove của HashMap. Để bảo đảm node trong doubly linked list cũng được remove đồng thời sau khi key-value pair bị remove, LinkedHashMap override method rỗng afterNodeRemoval của HashMap.
final Node<K,V> removeNode(int hash, Object key, Object value,
                               boolean matchValue, boolean movable) {
        // lược bỏ
            if (node != null && (!matchValue || (v = node.value) == value ||
                                 (value != null && value.equals(v)))) {
                if (node instanceof TreeNode)
                    ((TreeNode<K,V>)node).removeTreeNode(this, tab, movable);
                else if (node == p)
                    tab[index] = node.next;
                else
                    p.next = node.next;
                ++modCount;
                --size;
                // Sau khi remove phần tử, removeNode của HashMap sẽ gọi afterNodeRemoval để thực hiện thao tác hậu kỳ
                afterNodeRemoval(node);
                return node;
            }
        }
        return null;
    }
// implementation rỗng
void afterNodeRemoval(Node<K,V> p) { }
Có thể thấy method remove được kế thừa từ HashMap gọi method removeNode. Sau khi xóa node khỏi bucket, removeNode gọi afterNodeRemoval.
void afterNodeRemoval(Node<K,V> e) { // unlink

    // Lấy node hiện tại p, predecessor b và successor a của e
        LinkedHashMap.Entry<K,V> p =
            (LinkedHashMap.Entry<K,V>)e, b = p.before, a = p.after;
    // Đặt pointer predecessor và successor của p thành null để ngắt liên kết với predecessor và successor
        p.before = p.after = null;

    // Nếu predecessor là null, nghĩa là node hiện tại p là node đầu linked list, chỉ cần để pointer head trỏ đến successor a
        if (b == null)
            head = a;
        else
        // Nếu predecessor b không phải null, để b trực tiếp trỏ đến successor a
            b.after = a;

    // Nếu successor là null, nghĩa là node hiện tại p ở cuối linked list, nên trực tiếp để pointer tail trỏ đến predecessor b
        if (a == null)
            tail = b;
        else
        // Ngược lại, để pointer predecessor của successor trực tiếp trỏ đến predecessor
            a.before = b;
    }
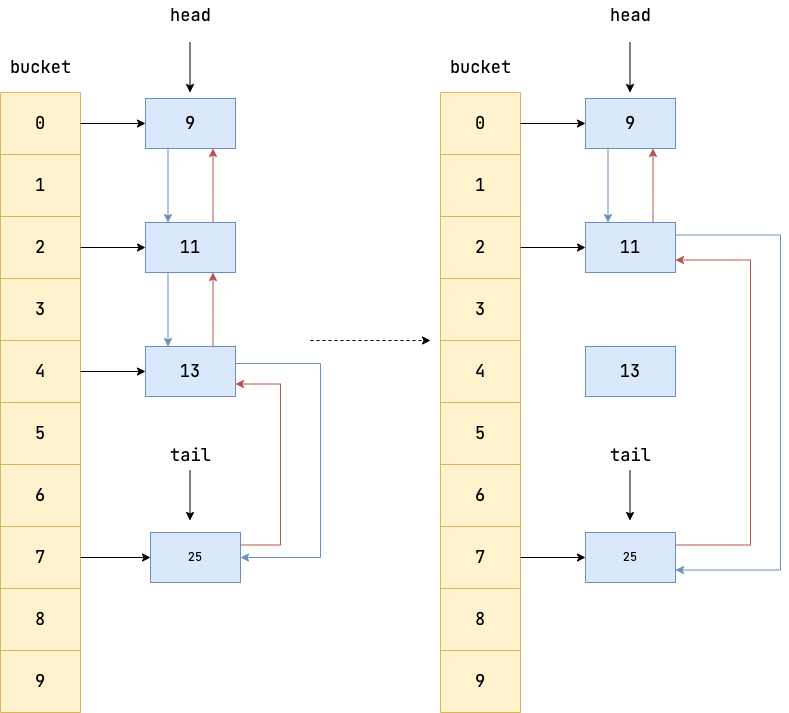
Từ source code có thể thấy thao tác tổng thể của method afterNodeRemoval là ngắt liên kết giữa node hiện tại p với predecessor và successor, chờ GC thu hồi. Các bước như sau:
- Lấy node hiện tại p, predecessor b và successor a của p.
- Ngắt liên kết giữa node hiện tại p với predecessor và successor.
- Thử để predecessor b trỏ đến successor a. Nếu b là null, nghĩa là node hiện tại p ở đầu linked list, chỉ cần để head trỏ đến successor a.
- Thử để successor a trỏ đến predecessor b. Nếu a là null, nghĩa là node hiện tại p ở cuối linked list, nên trực tiếp để pointer tail trỏ đến predecessor b.
Có thể kết hợp với hình dưới để hiểu: phần tử có key là 13 bị xóa, tức bị remove khỏi linked list.
Nếu vẫn chưa hiểu rõ cũng không sao, chỉ cần biết tác dụng của method này; sau này có thời gian hãy từ từ tìm hiểu thêm.
Thao tác hậu kỳ của method put - afterNodeInsertion
Tương tự, LinkedHashMap không tự triển khai method insertion, mà trực tiếp kế thừa tất cả method insertion của HashMap để người dùng sử dụng. Tuy nhiên, để duy trì thứ tự access của doubly linked list, nó thực hiện hai việc sau:
- Override
afterNodeAccess(đã đề cập ở trên). Nếu key đang được insert đã tồn tại trongmap, vì thao tác insertion củaLinkedHashMapsẽ thêm node mới vào cuối linked list nên với key đã tồn tại, nó gọiafterNodeAccessđể đưa key đó đến cuối linked list. - Override method
afterNodeInsertioncủaHashMap. KhiremoveEldestEntrytrả vềtrue, node đầu linked list sẽ bị remove.
Điều này có thể thấy trong method cốt lõi của thao tác insertion putVal của HashMap.
final V putVal(int hash, K key, V value, boolean onlyIfAbsent,
                   boolean evict) {
          // lược bỏ
            if (e != null) { // existing mapping for key
                V oldValue = e.value;
                if (!onlyIfAbsent || oldValue == null)
                    e.value = value;
                 // Nếu key hiện tại tồn tại trong map, gọi afterNodeAccess
                afterNodeAccess(e);
                return oldValue;
            }
        }
        ++modCount;
        if (++size > threshold)
            resize();
         // Gọi method hậu kỳ sau insertion, method này được LinkedHashMap override
        afterNodeInsertion(evict);
        return null;
    }
Source code của các bước trên đã được giải thích ở phần trước, nên ở đây chỉ tập trung tìm hiểu flow của afterNodeInsertion. Giả sử ta override removeEldestEntry; khi size của linked list vượt quá capacity, method trả về true.
/**
 * Trả về true khi size vượt quá capacity, báo cho LinkedHashMap xóa cache item cũ nhất (tức phần tử đầu linked list)
 */
protected boolean removeEldestEntry(Map.Entry < K, V > eldest) {
    return size() > capacity;
}
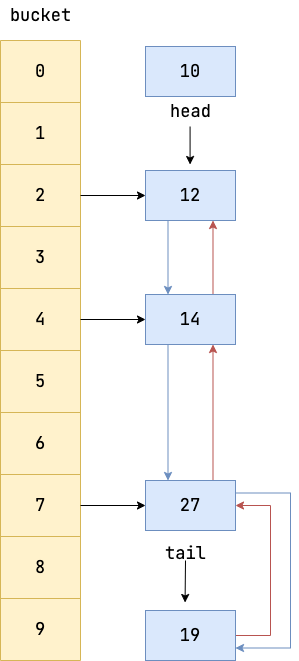
Lấy hình dưới làm ví dụ: giả sử node mới insert cuối cùng là node 19 chưa tồn tại, capacity là 4, nên removeEldestEntry trả về true và ta cần remove node đầu linked list.
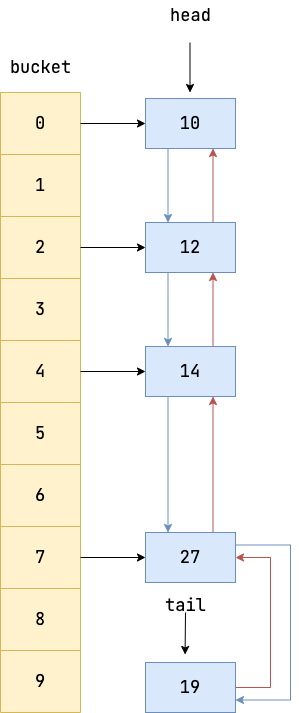
Các bước remove rất đơn giản: kiểm tra node đầu linked list có tồn tại không. Nếu có, ngắt liên kết giữa node đầu và successor, để pointer của node đầu trỏ đến node tiếp theo. Vì vậy, pointer head trỏ đến 12, còn node 10 trở thành object rỗng không còn reference nào trỏ đến và chờ GC.
void afterNodeInsertion(boolean evict) { // possibly remove eldest
        LinkedHashMap.Entry<K,V> first;
        // Nếu evict là true, phần tử đầu không rỗng và removeEldestEntry trả về true, nghĩa là cần remove phần tử cũ nhất (tức phần tử ở đầu linked list)
        if (evict && (first = head) != null && removeEldestEntry(first)) {
          // Lấy key của key-value pair ở đầu linked list
            K key = first.key;
            // Gọi removeNode để remove phần tử khỏi bucket của HashMap và ngắt liên kết với doubly linked list của LinkedHashMap, chờ GC thu hồi
            removeNode(hash(key), key, null, false, true);
        }
    }
Từ source code có thể thấy method afterNodeInsertion thực hiện các thao tác sau:
- Kiểm tra
evictcó phảitruekhông. Chỉ khi làtruemới có khả năng cần remove key-value pair cũ nhất (tức phần tử ở đầu linked list). Việc có thực sự cần remove hay không còn phụ thuộc vào linked list có rỗng không((first = head) != null)và methodremoveEldestEntrycó trả vềtruekhông. Chỉ khi cả hai điều kiện này đúng mới có thể xác định linked list hiện không rỗng và cần remove. - Lấy key của phần tử đầu linked list.
- Gọi method
removeNodecủaHashMap. Như đã đề cập ở trên, method này remove node khỏi bucket củaHashMap. Ngoài ra,LinkedHashMapđã override methodafterNodeRemovaltrongremoveNode, nên bước này sẽ remove phần tử khỏi bucket củaHashMap, ngắt liên kết với doubly linked list củaLinkedHashMapvà chờ GC thu hồi.
So sánh hiệu suất iteration giữa LinkedHashMap và HashMap
LinkedHashMap duy trì một doubly linked list để ghi lại thứ tự insertion của data. Vì vậy, khi tạo iterator để iteration, nó duyệt theo đường đi của doubly linked list. So với cách HashMap duyệt toàn bộ bucket, cách này hiệu quả hơn nhiều.
Có thể kiểm chứng điều này từ iterator của hai class. Trước tiên hãy xem iterator của HashMap. Có thể thấy khi iteration key-value pair, HashMap dùng method nextNode. Method này trả về phần tử tiếp theo mà next trỏ đến, rồi bắt đầu từ next để duyệt bucket và tìm Node không rỗng tiếp theo trong bucket kế tiếp.
 final class EntryIterator extends HashIterator
 implements Iterator < Map.Entry < K, V >> {
     public final Map.Entry < K,
     V > next() {
         return nextNode();
     }
 }

 // Lấy Node tiếp theo
 final Node < K, V > nextNode() {
     Node < K, V > [] t;
     // Lấy node tiếp theo
     Node < K, V > e = next;
     if (modCount != expectedModCount)
         throw new ConcurrentModificationException();
     if (e == null)
         throw new NoSuchElementException();
     // Để next trỏ đến Node không rỗng tiếp theo trong bucket
     if ((next = (current = e).next) == null && (t = table) != null) {
         do {} while (index < t.length && (next = t[index++]) == null);
     }
     return e;
 }
Ngược lại, iterator của LinkedHashMap trực tiếp dùng pointer after để nhanh chóng định vị successor của node hiện tại, ngắn gọn và hiệu quả hơn nhiều.
 final class LinkedEntryIterator extends LinkedHashIterator
 implements Iterator < Map.Entry < K, V >> {
     public final Map.Entry < K,
     V > next() {
         return nextNode();
     }
 }
 // Lấy Node tiếp theo
 final LinkedHashMap.Entry < K, V > nextNode() {
     // Lấy node tiếp theo next
     LinkedHashMap.Entry < K, V > e = next;
     if (modCount != expectedModCount)
         throw new ConcurrentModificationException();
     if (e == null)
         throw new NoSuchElementException();
     // Pointer current trỏ đến node hiện tại
     current = e;
     // next trực tiếp dùng pointer after của node hiện tại để nhanh chóng định vị node tiếp theo
     next = e.after;
     return e;
 }
Để kiểm chứng nhận định trên, tác giả đã benchmark hai container này, đo thời gian insert 10 triệu và iteration 10 triệu data. Code như sau:
int count = 1000_0000;
Map<Integer, Integer> hashMap = new HashMap<>();
Map<Integer, Integer> linkedHashMap = new LinkedHashMap<>();

long start, end;

start = System.currentTimeMillis();
for (int i = 0; i < count; i++) {
    hashMap.put(ThreadLocalRandom.current().nextInt(1, count), ThreadLocalRandom.current().nextInt(0, count));
}
end = System.currentTimeMillis();
System.out.println("map time putVal: " + (end - start));

start = System.currentTimeMillis();
for (int i = 0; i < count; i++) {
    linkedHashMap.put(ThreadLocalRandom.current().nextInt(1, count), ThreadLocalRandom.current().nextInt(0, count));
}
end = System.currentTimeMillis();
System.out.println("linkedHashMap putVal time: " + (end - start));

start = System.currentTimeMillis();
long num = 0;
for (Integer v : hashMap.values()) {
    num = num + v;
}
end = System.currentTimeMillis();
System.out.println("map get time: " + (end - start));

start = System.currentTimeMillis();
for (Integer v : linkedHashMap.values()) {
    num = num + v;
}
end = System.currentTimeMillis();
System.out.println("linkedHashMap get time: " + (end - start));
System.out.println(num);
Từ output có thể thấy, vì LinkedHashMap cần duy trì doubly linked list nên insert phần tử tốn thời gian hơn HashMap. Tuy nhiên, nhờ quan hệ rõ ràng giữa predecessor và successor trong doubly linked list, hiệu suất iteration cao hơn đáng kể. Dù vậy, nhìn chung khác biệt không lớn, vì lượng data này rất lớn.
map time putVal: 5880
linkedHashMap putVal time: 7567
map get time: 143
linkedHashMap get time: 67
63208969074998
Câu hỏi phỏng vấn LinkedHashMap thường gặp
LinkedHashMap là gì?
LinkedHashMap là một subclass của HashMap trong Java Collections Framework. Nó kế thừa toàn bộ thuộc tính và method của HashMap, đồng thời override các method afterNodeRemoval, afterNodeInsertion, afterNodeAccess trên nền HashMap, nhờ đó có đặc điểm insertion theo thứ tự và access theo thứ tự.
LinkedHashMap iteration phần tử theo thứ tự insertion như thế nào?
Iteration phần tử theo thứ tự insertion là behavior mặc định của LinkedHashMap. Bên trong LinkedHashMap duy trì một doubly linked list để ghi lại thứ tự insertion của phần tử. Vì vậy, khi dùng iterator để iteration phần tử, thứ tự phần tử giống với thứ tự chúng được insert ban đầu.
LinkedHashMap iteration phần tử theo thứ tự access như thế nào?
LinkedHashMap có thể chỉ định iteration phần tử theo thứ tự access thông qua parameter accessOrder trong constructor. Khi accessOrder là true, mỗi lần access một phần tử, phần tử đó sẽ được chuyển đến cuối linked list. Vì vậy, trong lần access tiếp theo, nó sẽ trở thành phần tử cuối cùng trong linked list, từ đó thực hiện iteration theo thứ tự access.
LinkedHashMap triển khai LRU cache như thế nào?
Đặt accessOrder thành true và override method removeEldestEntry để trả về true khi kích thước linked list vượt quá capacity. Khi đó, mỗi lần access một phần tử, phần tử đó được chuyển đến cuối linked list. Một khi thao tác insertion khiến removeEldestEntry trả về true, cache được xem là đầy và LinkedHashMap sẽ remove phần tử đầu linked list, từ đó có thể triển khai LRU cache.
LinkedHashMap khác HashMap như thế nào?
LinkedHashMap và HashMap đều là implementation class của interface Map trong Java Collections Framework. Khác biệt lớn nhất nằm ở thứ tự iteration phần tử. Thứ tự iteration phần tử của HashMap không xác định, còn LinkedHashMap hỗ trợ iteration theo thứ tự insertion hoặc access. Ngoài ra, LinkedHashMap duy trì một doubly linked list bên trong để ghi lại thứ tự insertion hoặc access của phần tử, còn HashMap không có linked list này. Vì vậy, performance insertion của LinkedHashMap có thể thấp hơn HashMap một chút, nhưng nó cung cấp nhiều chức năng hơn và hiệu suất iteration cũng cao hơn HashMap.
Tài liệu tham khảo
- Phân tích chi tiết source code LinkedHashMap (JDK1.8): https://www.imooc.com/article/22931
- HashMap và LinkedHashMap: https://www.cnblogs.com/Spground/p/8536148.html
- Bắt nguồn từ source code LinkedHashMap: https://leetcode.cn/problems/lru-cache/solution/yuan-yu-linkedhashmapyuan-ma-by-jeromememory/
Lời cuối
Nếu nội dung hữu ích với bạn, hãy tiện tay tặng JavaGuide một Star miễn phí để ủng hộ: GitHub | Gitee.
JavaGuide đã được duy trì gần bảy năm, tích lũy 6100+ commit, với sự chung tay hoàn thiện của 620+ contributor. Star, phản hồi và PR của bạn đều là động lực để dự án tiếp tục cập nhật.
Nếu bạn đang chuẩn bị phỏng vấn backend / phát triển ứng dụng AI, có thể tham khảo Knowledge Planet của tôi, bao gồm các project thực tế về backend và AI, tối ưu CV, hỏi đáp 1-1 và tài liệu về các trọng điểm thường gặp, đã được duy trì liên tục sáu năm.